how to

Five Most Common Problems With Vertical Blinds ~ Blog

Five Most Common Problems With Vertical Blinds

OK today, I am going to be showing you the five most common problems with vertical blinds.

00:13 One of the most common problems is simply a blind slat being out of step something as simple as this where it is just going to hang up and now your blinds are not going to turn and open up.

So first thing is your going to want to go along and make sure that all of your blinds are in a row and that’s one of the most common problems.

00:35 Another most common problem is a broken blind slat itself often they will break off right here and what you can do is flip your blind slat over and use a hole punch and punch some new holes and than re hang it up.

If you want to you can trim it off straight or you can get replacement slats and trim them down. I have a video on those repairs, video on that repair and I will try to put the link on this video so you can click over to it.

01:02 The Third most often repair that’s needed is a stripped master gear now as I showed you if one of the deals was hanging up or the blinds were hanging up and someone continued to try to force it. It can strip the master gear. And there is a couple of different types of master gears this one is a
self aligning master gear it links underneath the first slat. This one you can take out these screws and link it to the first carrier. I’ve got a video on that also so I will try to put the link on here.

01:35 Fourth most common type of repair that is needed is where you have an individual blind that is not turning all the other ones are turning just fine. And that one individual blind is not turning.

What’s needed is either the head the uh… the gear herehas got some broken teeth on it or the comb gear itself has broken off and these can be replaced.

I also have a video on that I will put the link on this video it is for the stem
and comb gear.

02:05 And the Fifth most common problem with vertical blinds is that the blinds are hard to open. Now, this one is not so bad, it slides pretty easy, but if you had a set that was hard to open what you want to do is lube it with silicone spray. Apply it to the entire length inside the track. And it is not the best smelling stuff in the world but it really does a good job in lubing the blinds because what it does silicone lube dries and it still maintains its lubricant qualities. And because it dries it is not going to collect as much dust and dirt and debris and than clog up.

Anyway once you put it on let it dry for about 15 minutes and than go ahead and work the blinds in  and you are good to go.

And that is the five most common problems with vertical blinds.
There’s a few others. I will try to add them on later but that’s about the five most common.
Posted by Kung Fu Maintenance in The KFM Blog, Tips, 0 comments

How To Stop Vertical Blinds From Dragging On The Ground

00:08 OK Here is a quick one.
00:10 You’ve got some vertical blinds that are dragging on the ground.
00:13 You could trim them down but if it’s a matter of them not being even
00:17 what you can do just as a quick deal
00:19 is lift
00:24 as long as your
00:26 brackets are mounted in the studs.
00:30 What you can do is lift
00:32 the blinds and
00:35 bend the bracket up just a hair
00:38 to get the
00:41 slats off the ground.
00:53 Than if you need to you can put like a wedge underneath
00:58 to lift it up enough so the
01:02 blinds all clear.
01:06 anyway i’m gonna trim that wedge down make it little bit better
01:09 under there so it’s a little more
01:12 secured in there.
01:15 And we will be good to go. So now I just cut off a smaller piece of the wedge.
01:20 And anchored it back there
01:22 so it’s not going to come out on us
01:24 and that’s enough to lift the blinds up off the ground. Keep them from dragging. :o)
Posted by Kung Fu Maintenance in The KFM Blog, Tips, 0 comments

How To Convert Vertical Blinds From Cord And Chain To A Wand

If you have corded vertical blinds that have a centered master control gear running through the center of the gear channels than the blinds can be converted. All you need is a master wand control, a wand, and about fifteen minutes spare time to make the change. First loosen and remove both end brackets. Next remove the gear mechanisms from inside the end caps (usually held in place by a keeper). Discard the inner gears and blind chain. Behind the blind gears opposite of the corded end you will find the cord is knotted or split weight clipped. Cut off the knots or split weights and remove the entire cord. (Watching the youtube video I made on this will help you better understand the steps involved.)

Next find the keeper and make sure it is installed in the proper place just in front of what will be the very last slat. If it is in the wrong place remove it and install it in the proper place. If the blind slats are curved the convex portion should go to the back. Next install the rear end bracket. Now slip off any guides in the way of the first stem control and remove about the first four slats to give better access. Next slide out the main gear a bit and some of the blind stem controls enough for you to use your screwdriver more easily.

The new master control will have two screws that pass through it linking it to a stem control. Remove the two screws and discard the stemless stem control. Next slide the master wand control onto the main gear, screw holes facing towards the blinds. Next slide the first stem control up against the master control and use the two screws to link the first stem control to it. Now re-install the guides previously removed and reattach the end cap.

Attach the blind wand, reinstall your four slats and your ready to test the blinds for proper rotation. If you can’t get a full rotation you may need to pop each stem over a couple points. I will try to cover this better in a future video so subscribe to my Youtube channel if you want to be one of the first people to see that video (your subscribing helps support and encourage me to make more videos and write more blogs).

As I have mentioned before do be careful as the blind head rail is very sharp unfinished metal and cuts flesh just a bit to easily. The video on Stems and Gears should help a bit in understanding the way vertical blinds work.

~ I Wish You Great Success ~
~ Kung Fu Maintenance ~

Posted by Kung Fu Maintenance in The KFM Blog, Tips, 0 comments

Getting Vertical ~ Repairing Vertical Blinds

Let us say you go to open your vertical blinds and oh no, the blinds won’t open. The first thing to check for is any blind slats that are out of line with the others. Look for any that are overlapping the others the wrong way and push the top corner to set it the right way. This is the most often needed repair for vertical blinds. Blinds often get out of alignment due to wind, people, pets, vacuums, chairs etc…


A bigger problem is when one of the gears gets turned out of step with the other gears. The repair is performed by turning the stem the right way. Sometimes you can grab the stem and turn it with your hand. Take care not to bend the slat itself or it may break. Often you will need or want to remove the slat. That makes it easier to grab the stem with a pair of pliers and then pop it over.

This repair sometimes causes a gear tooth to break. Replacing stem gears is fairly easy and I will try to make a video for that repair in the future. I cover all of these repairs and much more in my book, Kung Fu Maintenance. I have another video at present titled The Master Blind Gear. I hope you like it and that it serves you well. It covers (as you probably guessed) how to replace a stripped master blind gear controller for vertical blinds.

Be extra careful when working with blinds and appliances as the metal is often unfinished metal and very sharp. I have given blood numerous times. A little precaution makes for a better day.

~~~ Get Vertical ~~~ Stay Above Horizontal ~~

~~~~~~~~~~~~~~~~~~ Kung Fu Maintenance ~~~~~~~~~~

Posted by Kung Fu Maintenance in The KFM Blog, 0 comments

Seven Smart Steps to Lower Cooling Bills, Improve Air Quality, and Preserve Air Condition Units

Clean Condensor Coils.

First pull the A/C disconnect and discharge the capacitor. Next rinse the coils with a garden hose and hand sprayer (make sure the spray is not too strong to avoid bending the condenser fins) starting from the inside fins thru the lid, spray as much of the dirt to the outside. Avoid getting the fan condenser motor wet but do rinse off the blades as needed. Next clean off the outside of the fins with the spray spraying straight but angle downward. Avoid spraying sideways to prevent bending the fins. Next apply the coil cleaner with a garden sprayer or by following manufacturer’s recommendations. Wait manufacturers recommended time (usually about five minutes) and rinse the coils inside and out thoroughly.

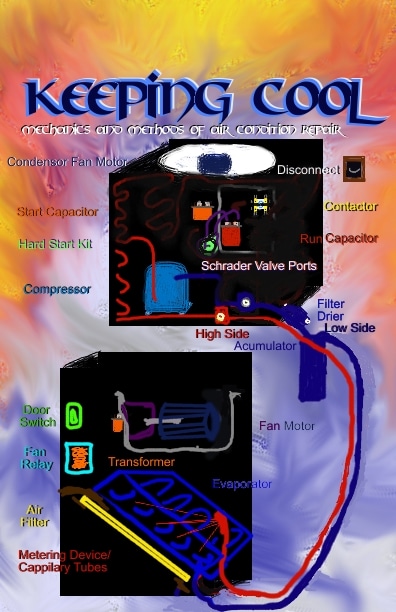
Mechanics and Methods of Air Conditioner Repair

Artwork diagram from the book Kung Fu Maintenance

Clean Evaporator Coils.

A no rinse evaporator coil cleaner is the easiest way to clean the evaporator coil. Spray it on the coils turn on the evaporator coil. Reset the panel door turn on the A/C and wait the manufacturers recommended time (usually between five and thirty minutes).

Replace  Air Filters.

Replace filters every three months and every month if possible during higher use seasons. If you or a family member suffer from allergies use a HEPA filter. HEPA stands for high efficiency particle arrestor. The HEPA filter catches smaller particles so your noses and lungs don’t have to.

Clear Condensate Pans, Drains,  and Lines.

Use a wet dry vacuum to vacuum out the pan and lines. On some systems you may need to hook up a smaller hose to the wet dry suction to get better access to the pan. You can make a quick rig for this with a small length of plastic hose and duct tape. Just insert two to three foot length of hose into wet dry vacuum suction hose end and duct tape in place wrapping the tape around the union covering all gaps (makeshift reducer coupling).

Add Condensate Tablets to Drain Pans.

Good condensate pan tablets contain rust and mold inhibitors. They also contain an anti-coagulant that keeps the dirt from clumping together and clogging your condensate drain. They will help preserve the life of your condensate drain pan as well as help keep the air you and your guests are breathing healthier and better smelling.

Tape all Areas of Air Leakage at Air Handler.

Apply HVAC foil tape or other HVAC rated tape to seal any open joints. Use an old dollar bill or a paper towel to locate any air leakage whether blowing out or sucking in. Hold the dollar bill or paper by one end and see if the other end is affected, either sucked towards or blown away from the air handler when you move it around the system. That is a one dollar or less air leak locator. Seal off any leakages with tape to improve the efficiency of the system.

Check for Fifteen to Twenty Degree Split.

Turn on the system and wait five to ten minutes for the pressures to equalize. Test the temperature going in the intake vent and then test the temperature coming out of one of the registers. If you have two thermometers, set one up at each, and take your readings. If your reading coming out of the register is fifteen to twenty degrees cooler then the air being sucked into the intake then your refrigerant charge is ok. If not then your system will need to be charged and the refrigerant leak located (most often at a Schrader valve, I cover this and many other factors in my book Kung Fu Maintenance). If you are not EPA certified you will need the services of a qualified HVAC technician.

~~~ Stay Cool ~~

~~~~~~ Kung Fu Maintenance ~~~~~

Posted by Kung Fu Maintenance in Air Conditions, The KFM Blog, Tips, 0 comments