Kung Fu Maintenance

KFM Reasonings to Choose Dupont ISCEON R-438A Over R-410A

While R410A air conditioning puts out more cooling BTU’s it often uses more electrical energy in the short and/or long run.

R410A equipment often has a higher amp draw requiring wiring upgrades, larger breakers, larger wires, larger electrical whips, and fuses etc…

Often evaporator coils and line sets need to be replaced to accommodate the higher pressures that R410a uses.

ISCEON® MO99™ (alternatively called R-438A) retrofit has far less of an environmental impact.

R-22 system does not need to be flushed when retro fitting to ISCEON MO99. For R-410A retrofit, system must be flushed and oil changed.

For ISCEON MO99 retrofit, oil does not need to be replaced. R-410A uses a different oil type (poe (polyester) oil) that will not mix right with R-22’s oil type (mineral oil) and so oil must be changed.

ISCEON MO99 can be used with existing R-22 condensors and evaporators as long as Schrader valves and or seals are replaced. (ISCEON MO99 refrigerant causes seals that have been using R-22 to shrink.) R-410A uses higher pressures and should not be used with R-22 compressors so whole condensers are usually replaced, seals and all.

ISCEON M099 has a lower operating temperature at the compressor and is slightly easier on the compressor the heart of the air condition system.
Both R410A and ISCEON MO99 are not going to be phased out thru the Montreal Protocol like R-22 in 2020.

ISCEON M099 does not damage the ozone layer. (At least not like cows do! Or R-22)

Of course all of this is debatable and that should be interesting so let’s get at it. If you have some ideas why you think R-410A (or another refrigerant) is the way to go I would love to hear them. Alternatively, if you have any more points about the benefits of ISCEON MO99 (R438A) that would be cool. Share your experiences here on The KFM Blog as a response. If I think they are worthy I will post them as long as things are kept clean. Fair Enough?

~~~ Keep it Cool ~ Keep It Real ~~~

~~~~~~~~~~ Kung Fu Maintenance ~~~~~
 

Posted by Kung Fu Maintenance in Air Conditions, The KFM Blog, Tips, 2 comments

Increasing Your Balance ~ Weighting out a Ceiling Fan Wobble

This is  my eleventh video. It was the first Kung Fu Maintenance video I used my voice on. To my surprise it has gotten far more hits than any of my others. This is true even though (among my vids) it is one of the most disliked uploaded videos. Perhaps for the noise (voice) (music) but I think more than anything for the fact that this repair takes so much patience. It is a tried and true method and I have done it many times. It is not my favorite repair either but it normally works, unless the fan is beyond balancing. I have had many dislikes over the brand of this particular fan. Also I think it gets many dislikes because there are some who think it is not worth it to balance a fan (or believe it impossible) and would rather buy a new one. This is fine. (You can make pizza, if you have the dough( and sauce, and cheese etc. . ). What follows is for the savers.


First clean the fan. Then tighten up all the screws. Tighten the fan blade screws and especially the down rod set screws where the down rod goes into the fan top. Often times this is enough to fix the wobble. Sometimes you can adjust the position of the light kit or the position of the down rod socket by pushing the whole fan up and turning a little bit (with power off of course). Try several different positions to see if you can rid the wobble.

If those attempts don’t rid your wobble than you will need a fan balancing kit. They are sold at most hardware stores or you can order one from my store Kung Fu Maintenance Supply and Appliance. They usually have instructions to follow which normally involve the following.

Clip the fan blade weight clip to the back edge of a fan blade either on the very end center or in the middle at the back of the blade. Turn the fan on and note if it wobbles more or less. Note the blade you started with than do the same on each of the other fan blades to determine which one gives you the least amount of wobble. This takes a lot of patience as you have to let the fan blades stop each time so no one gets hurt.

Next clip the fan weight in the center at the back of the fan blade with the least wobble. Slide the clip two inches toward the fan center and check the wobble. Than slide the clip four inch away from the center of the fan blade. Whichever direction towards the center or further away gives you the least wobble continue checking for the least wobble in two inch increments until you determine the best spot for least wobble. This is where you will stick one of the fan weights clean the spot on the center top of the fan blade really well. This way the weight doesn’t go flying off later (It’s all fun and games till someone gets hurt). Remove the plastic covering the adhesive and press it down top center of the fan blade directly in line with your fan weight clip.

Now you can remove the fan weight clip and check for wobbling. All set you’re all done but if there is still some wobble sometimes it takes more than one weight. This is why the weight kit usually comes with two or three weights. Repeat the entire process again with the second and if necessary the third weight. Yes it is understandable that this video gets some dislikes. I could even sometimes dislike it myself. It puts a real tester on ADD and caffeinated people .


~~~Increasing your Balance~~~

~~~~~~~~~~Kung Fu Maintenance~~~~~~~~~~~


Posted by Kung Fu Maintenance in Air Conditions, The KFM Blog, Tips, 0 comments

Seven Smart Steps to Lower Cooling Bills, Improve Air Quality, and Preserve Air Condition Units

Clean Condensor Coils.

First pull the A/C disconnect and discharge the capacitor. Next rinse the coils with a garden hose and hand sprayer (make sure the spray is not too strong to avoid bending the condenser fins) starting from the inside fins thru the lid, spray as much of the dirt to the outside. Avoid getting the fan condenser motor wet but do rinse off the blades as needed. Next clean off the outside of the fins with the spray spraying straight but angle downward. Avoid spraying sideways to prevent bending the fins. Next apply the coil cleaner with a garden sprayer or by following manufacturer’s recommendations. Wait manufacturers recommended time (usually about five minutes) and rinse the coils inside and out thoroughly.

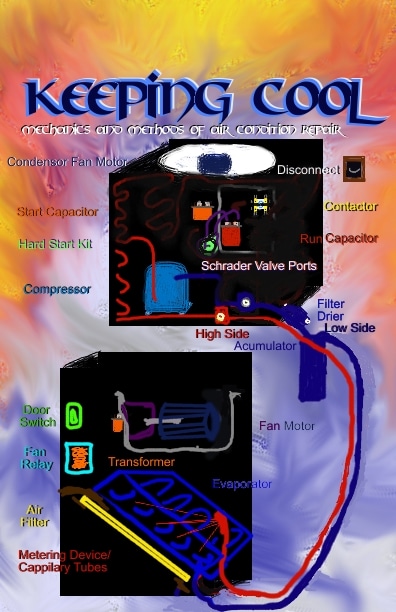
Mechanics and Methods of Air Conditioner Repair

Artwork diagram from the book Kung Fu Maintenance

Clean Evaporator Coils.

A no rinse evaporator coil cleaner is the easiest way to clean the evaporator coil. Spray it on the coils turn on the evaporator coil. Reset the panel door turn on the A/C and wait the manufacturers recommended time (usually between five and thirty minutes).

Replace  Air Filters.

Replace filters every three months and every month if possible during higher use seasons. If you or a family member suffer from allergies use a HEPA filter. HEPA stands for high efficiency particle arrestor. The HEPA filter catches smaller particles so your noses and lungs don’t have to.

Clear Condensate Pans, Drains,  and Lines.

Use a wet dry vacuum to vacuum out the pan and lines. On some systems you may need to hook up a smaller hose to the wet dry suction to get better access to the pan. You can make a quick rig for this with a small length of plastic hose and duct tape. Just insert two to three foot length of hose into wet dry vacuum suction hose end and duct tape in place wrapping the tape around the union covering all gaps (makeshift reducer coupling).

Add Condensate Tablets to Drain Pans.

Good condensate pan tablets contain rust and mold inhibitors. They also contain an anti-coagulant that keeps the dirt from clumping together and clogging your condensate drain. They will help preserve the life of your condensate drain pan as well as help keep the air you and your guests are breathing healthier and better smelling.

Tape all Areas of Air Leakage at Air Handler.

Apply HVAC foil tape or other HVAC rated tape to seal any open joints. Use an old dollar bill or a paper towel to locate any air leakage whether blowing out or sucking in. Hold the dollar bill or paper by one end and see if the other end is affected, either sucked towards or blown away from the air handler when you move it around the system. That is a one dollar or less air leak locator. Seal off any leakages with tape to improve the efficiency of the system.

Check for Fifteen to Twenty Degree Split.

Turn on the system and wait five to ten minutes for the pressures to equalize. Test the temperature going in the intake vent and then test the temperature coming out of one of the registers. If you have two thermometers, set one up at each, and take your readings. If your reading coming out of the register is fifteen to twenty degrees cooler then the air being sucked into the intake then your refrigerant charge is ok. If not then your system will need to be charged and the refrigerant leak located (most often at a Schrader valve, I cover this and many other factors in my book Kung Fu Maintenance). If you are not EPA certified you will need the services of a qualified HVAC technician.

~~~ Stay Cool ~~

~~~~~~ Kung Fu Maintenance ~~~~~

Posted by Kung Fu Maintenance in Air Conditions, The KFM Blog, Tips, 0 comments

Taking Back the Throne ~ Harry Porter and the Pumice Stone

So you clean your commode with a toilet brush use lots of chemical but no matter how much elbow grease and cleaning product you use you are still stuck with an ugly ring. What you need here is a pumice stone. If you have an epoxy colored toilet or have any doubt if the pumice stone might scratch the toilet than test it first, either inside the tank, or on the bottom, or back of the tank where it will not be seen. Wear two to three pairs of disposable latex gloves. Unwrap one end of the pumice stone and use it with your favorite bowl cleaner to rub out the ring. It is a soft sanding stone and it will not scratch your porcelain but with a little effort it will remove even the most stubborn rings. Back track your outer glove over the remaining pumice stone wrapping it up to save it for another round. Now your toilet looks more like a throne.

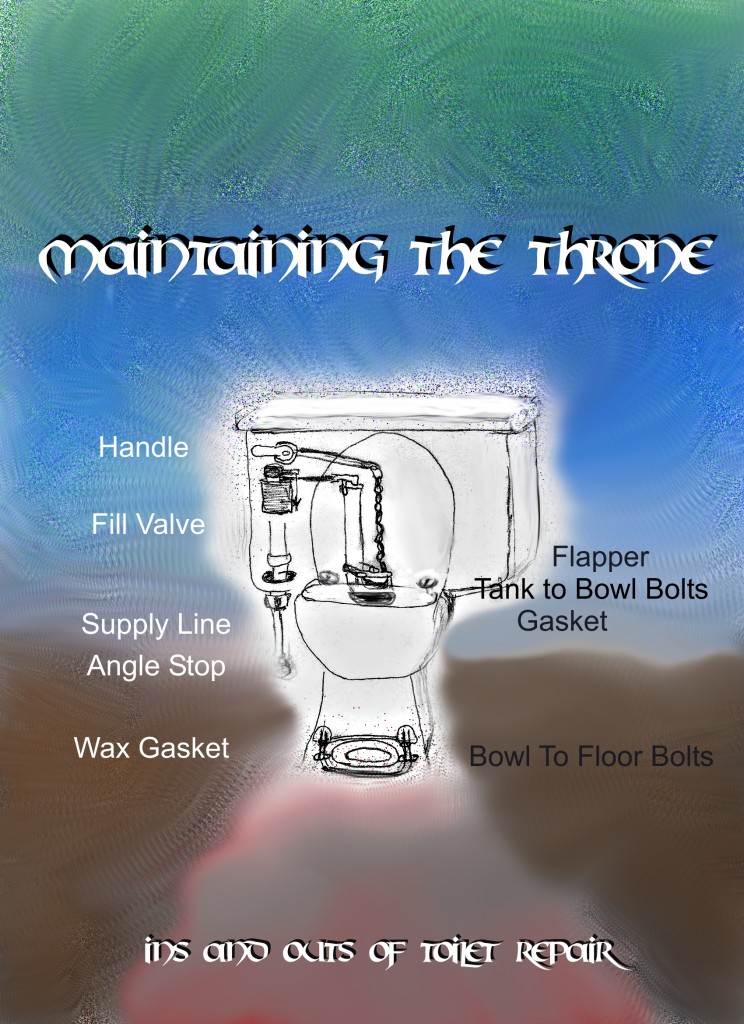
Ins and out of toilet repairs

Chapter 6 artwork diagram from the book Kung Fu Maintenance


~~~Maintaining the Throne~~~

~~~~~~~~~~Kung Fu Maintenance~~~~~~~


Posted by Kung Fu Maintenance in The KFM Blog, Tips, 1 comment

Defending Power Tool Battery Lives

[ad name=”Drills and Batteries”]
I have killed a lot of power tool batteries over the years and I wanted to try to spare you the same experience. In each instance what I did wrong was over use the tool so that it was overheated and kept pushing the battery to finish a job even though the battery was clearly low on power. What I have learned is that it is good to use your batteries till they are low on power and then recharge them in order to get good charging cycles. But what you don’t want to do is drive the battery into the ground when it is low on power. It can be frustrating if you are trying to finish up a job and your batteries run low. It is always good to have a backup battery for these instances, or even a back up tool.


More Power To You!

~~~~Kung Fu Maintenance~~~~


Posted by Kung Fu Maintenance in Power Tools, The KFM Blog, 0 comments